
Important NID Perspective Questions with Answers PDF Download (for 2027)
July 2, 2026
Quick Answer: NID perspective questions test your ability to draw 3D scenes with depth and spatial accuracy using techniques like one-point, two-point, and three-point perspective.
To prepare, practice vanishing points, horizon lines, and real-life scenes regularly, as perspective drawing is essential for scoring high in the NID DAT creative section.
Key Highlights: NID Perspective Questions 2027
- NID perspective questions assess depth, spatial understanding, and visual realism in drawings
- Common types include one-point, two-point, three-point, and five-point (fish-eye) perspective
- Perspective drawing is crucial for CAT (Creative Ability Test) and Studio Test performance
- Strong perspective improves idea clarity, storytelling, and visual communication
- Examiners evaluate vanishing points, proportion, scale, and clean presentation
- Regular practice of real-life scenes (rooms, streets, markets) builds accuracy and confidence
- Avoid mistakes like wrong perspective type, poor alignment, and incorrect scaling
- Perspective questions are frequently asked and can significantly impact your score
NID perspective questions test how well you can represent three-dimensional scenes on paper - conveying depth, spatial relationships, and realism. Mastery of perspective helps transform ideas into believable visuals, which is a major advantage in the subjective section of the exam.
In this blog, you’ll learn:
- What are NID perspective questions
- Why they’re critically important
- Types of perspective questions that appear
- Step-by-step methods + solved examples (NID perspective questions and answers)
- How to practice and avoid mistakes
- Tips & FAQs to help you ace the perspective section
By the end, you’ll be well-equipped to tackle perspective questions for NID 2027 with confidence.
Table of Contents
- Importance of Perspective Questions for NID 2027
- Types of NID 2027 Perspective Questions
- How to Approach NID Perspective Questions 2027: Step-by-Step
- Sample NID Perspective Questions with Solutions for 2027
- Mistakes to Avoid with NID Perspective Questions
- Practice Strategy for NID Perspective Questions 2027
Importance of Perspective Questions for NID 2027
1. Significant Weight in Drawing / Creative Tasks
In NID’s subjective tasks, drawing ability is a key differentiator. A well-executed perspective sketch can elevate your submission and catch the examiner’s eye.
2. Shows Spatial Visualization Skills
Perspective drawing reveals your understanding of form, depth, foreshortening, vanishing points - skills central to design thinking.
3. Realism & Clarity
Many design prompts require scenes, environments, product views. Faulty perspective breaks realism, confuses the onlooker, and weakens your concept.
4. Benchmarks in Studio / Mains
In the NID Studio Test, you may need to visualize scenes, spatial setups, or integrate form in context - perspective is foundational.
Hence, NID perspective questions 2027 aren’t optional, they’re essential for scoring high in the creative section.
Types of NID 2027 Perspective Questions
Following are the primary types of perspective drawing out of which NID drawing questions are expected to be asked in 2027:
1) Single-point (One Point) Perspective
All orthogonal (receding) lines converge to a single vanishing point (VP) on the horizon line. Used when the viewer faces a plane head-on (e.g., simple interior or street scenes with one vanishing point)
When NID asks this: Room interiors, corridors, straight streets, a front view of a stage or storefront, or any scene where one face is parallel to the picture plane.
How to draw (step-by-step):
1. Read prompt - identify eye level / viewpoint (standing, sitting).
2. Draw the horizon line (eye level).
3. Place single VP on the horizon (usually centre if head-on).
4. Lightly sketch the nearest plane facing the viewer (e.g., back wall).
5. Project lines from edges of the back wall to the VP to create floor, ceiling and side walls.
6. Add major objects (desk, door, shelves) by drawing their front faces first, then projecting their receding edges to the VP.
7. Insert human figures for scale.
8. Shade / hatch to indicate depth; erase unnecessary construction lines.
What examiners look for:
- Correct placement of VP & horizon
- Straight receding lines meeting the VP
- Proper scale (human figure proportion)
- Clean presentation and relevant details
Practice Questions for 2027:
1. Draw 6 quick one-point interiors in 20 minutes.
2. Convert photos of rooms to one-point sketches.
3. Sketch a study room showing a desk facing the window. Use single-point perspective.

2) Two-point Perspective
Two vanishing points on the horizon line. Verticals remain vertical; horizontal edges recede to left or right VPs. Used when viewing a corner or rotated object/building.
When NID asks this: Buildings at a corner, streets where you see two facades, furniture at angle, product placed at rotated angle - very common in urban or exterior scenes.
How to draw (step-by-step):
1. Decide horizon line (eye level)
2. Then draw a vertical line through the centre of the horizon line. Its the vertical edge (the corner) between VPs, this is the closest vertical to the viewer.
3. Place two points on horizon line (left and right of vertical line) and two points on vertical line (top and bottom of horizon line)
4. Connect the vanishing points and the two points on the vertical line, creating a diamond shape. (These are just guidelines, will be erased later).
5. Draw vertical lines intersecting horizon line on either sides of the centre.
6. Now draw diagonals through each intersecting point of these vertical lines with the diamond formed earlier. This is how you can form building faces.
7. Add windows/doors by creating rectangles on these faces and drawing their receding edges to the appropriate VP.
8. Insert foreground elements (lamppost, bench) with verticals and appropriate receding lines.
9. Add scale figures and shadows.
What examiners look for:
- Correct verticals (must stay vertical)
- Clean receding diagonals to correct VP
- Good sense of depth and overlap (foreground > midground > background)
Practice Questions for 2027:
- Sketched 2-point boxes and arrange groups of boxes to form streets.
- Draw the corner of a street with two shopfronts meeting at an angle, show a street vendor at the corner.
Read More: How to Draw Facial Features for Design Entrance Exams 2027
3) Three-point perspective / bird’s-eye / worm’s-eye
Adds a third vanishing point (usually above or below the horizon) to create dramatic height or depth (looking up or down at tall structures). Useful for strong vertical foreshortening.
Special cases of 3 point perspective:
- Bird’s-eye view is a high aerial viewpoint (plan + perspective)
- Worm’s-eye view is very low, looking up.
Both accentuate scale and are powerful for architectural dramatization.
When NID asks this: Dramatic exterior views, tall buildings from street level (worm’s-eye) or aerial views of plazas/rooftops (bird’s-eye).
Tips:
- Bird’s-eye reduces vertical visibility - emphasize plan-like layouts with perspective depth.
- Worm’s-eye compresses ground distance; ensure foreground elements are large and dramatic.
How to draw (step-by-step):
- Choose horizon and two horizontal VPs (left & right) as in 2-point.
- Add the third VP either high above the page (worm’s-eye) or below (bird’s-eye).
- Start with a vertical edge and project to left/right VPs for horizontal edges and to third VP for vertical edges.
- Build volumes, then add details and figures (figures will be foreshortened dramatically).
What examiners look for:
- Control over foreshortening and proportion
- Convincing scale differences (why top looks narrower)
- Clean, readable composition despite complexity
Practice Questions for 2027:
- Draw simple boxes from high and low vantage points.
- Convert 2-point street sketch into 3-point by adding top or bottom VP.
Also Check: NID Entrance Exam Preparation 2027 - Section-Wise Preparation Tips
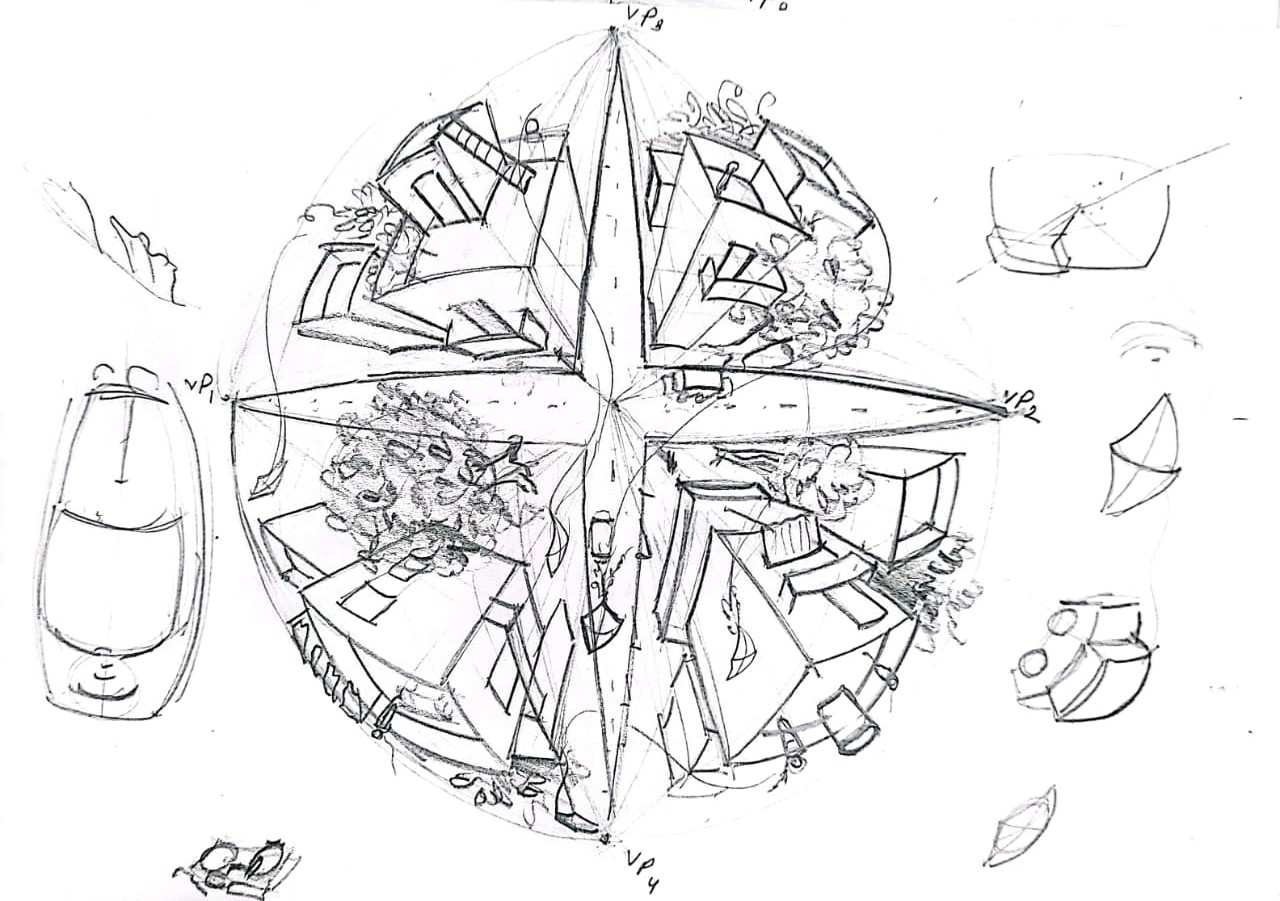
4) 5 point perspective (fish-eye-view)
Five-point perspective, often called the fish-eye view, is a curvilinear system that captures a 180° panoramic scene using five vanishing points - one at the centre and four at the ends of a circular field of view (left, right, up, down).
It mimics how a fish-eye lens bends straight lines into curves while maintaining spatial accuracy.
When NID May Ask This:
- Creative prompts like “Draw a city street from the viewpoint of a security camera lens”
- Visualize a market scene from a spherical reflection on a glass ball.
When to Use Five-Point Perspective in NID Answers:
- When you want to show drama or movement in your scene.
- For panoramic interiors/exteriors (cafeteria, plaza, city square).
- To express creative or imaginative views (e.g., inside a droplet, reflection).
- Use it only if you’re confident - clarity matters more than spectacle.
Practice More: NID CAT Questions 2027 - Important Questions with Answers
How to Approach NID Perspective Questions 2027: Step-by-Step
Here’s a proven step-by-step method to approach 2027 NID perspective questions in exam:
1. Read the Prompt Carefully
- Identify what needs to be drawn: room, street, object in scene.
- Note any special viewpoint to use in the question (bird’s eye, ground level).
- Note scale hints (doors, humans, furniture) given or assumed.
2. Decide Vanishing Point(s)
- Choose one-point if face is frontal.
- Choose two-point if edges are turned.
- Decide the horizon line’s placement (eye-level, high, low).
3. Sketch Light Construction Lines
- Draw horizon line.
- Mark vanishing point(s).
- Draw basic box or volume lines receding to vanishing point(s).
- Use light lines - this is the skeleton.
4. Block Major Forms
- Block walls, floor, ceiling, buildings, objects in the background/foreground.
- Determine relative scaling.
Also Check: How to Draw a Wall Texture for Design Entrance Exams
5. Refine & Add Details
- Add windows, doors, pillars, trees, people, texture lines.
- Shade or hatch lightly for volume.
- Ensure verticals stay vertical (for 2-point).
6. Annotate / Label as Needed
- Use arrows for depth hints.
- Label 'eye level,' 'vanishing point,' or 'foreground object.'
- If prompt asks, add short notes (e.g., 'foreground object shading').
7. Finalize with Clean Lines
- Erase unnecessary construction lines.
- Darken final edges, show contrast for clarity.
- Add scale figures to show proportion.
8. Review
- Check for distortions (parallel lines meeting at VP).
- Check proportions of objects/humans.
- Ensure horizon & VP align with prompt.
Sample NID Perspective Questions with Solutions for 2027 Prep
Below are a couple of sample prompts inspired by actual NID perspective questions and answers (as per the latest NID exam pattern), along with brief sketches of how you’d approach them (in text form).
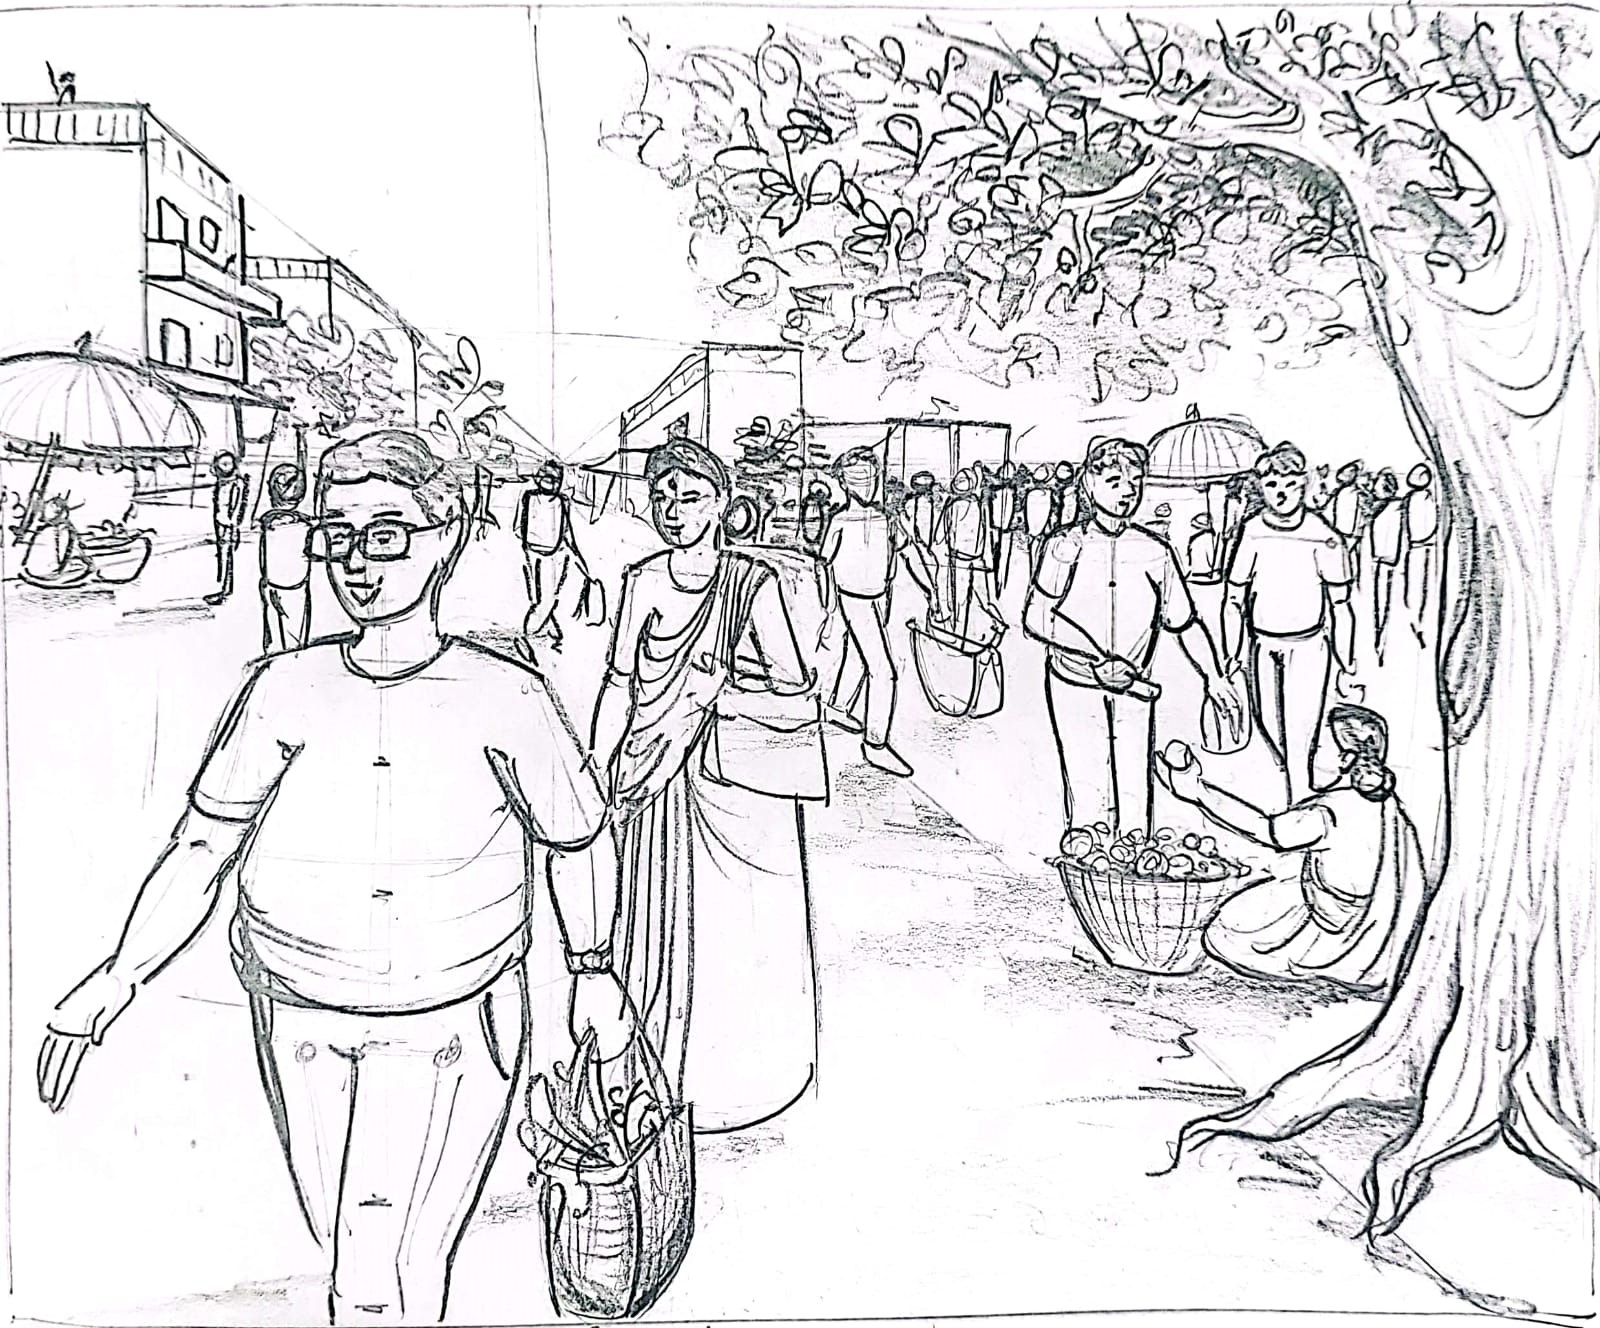
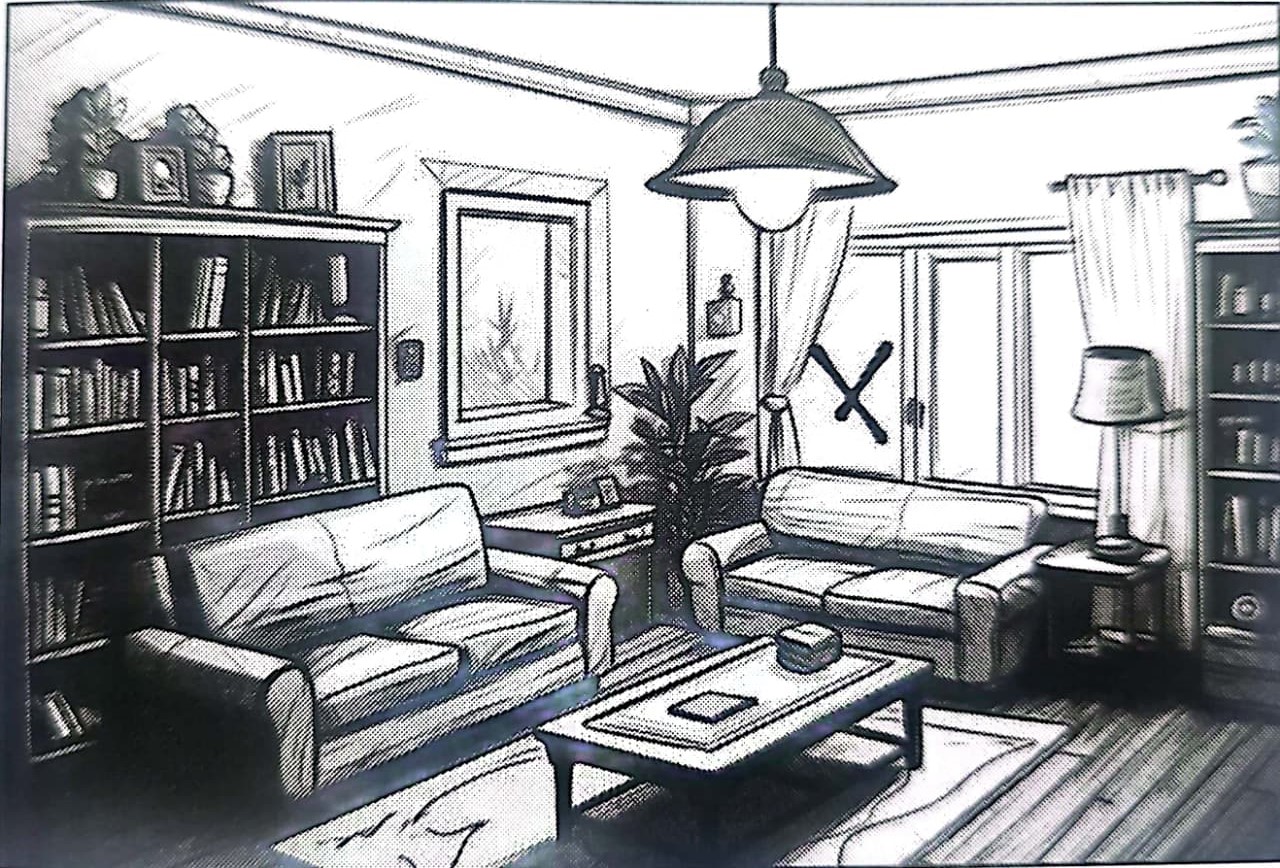
1. Draw a busy street market scene using one-point perspective. Show people walking, vendors selling goods, and surrounding elements like trees, stalls, and buildings that give a sense of depth and daily life.
Solution:
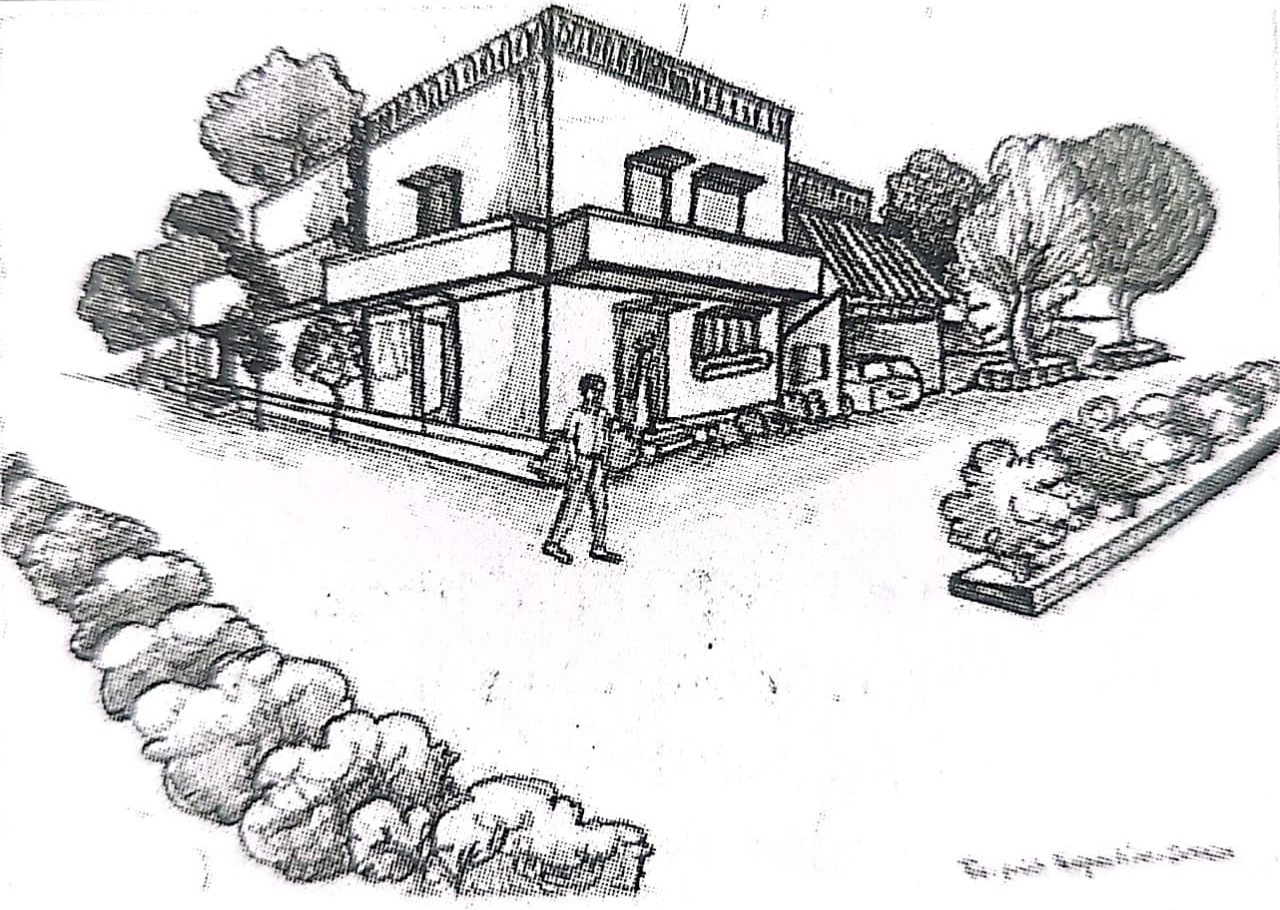
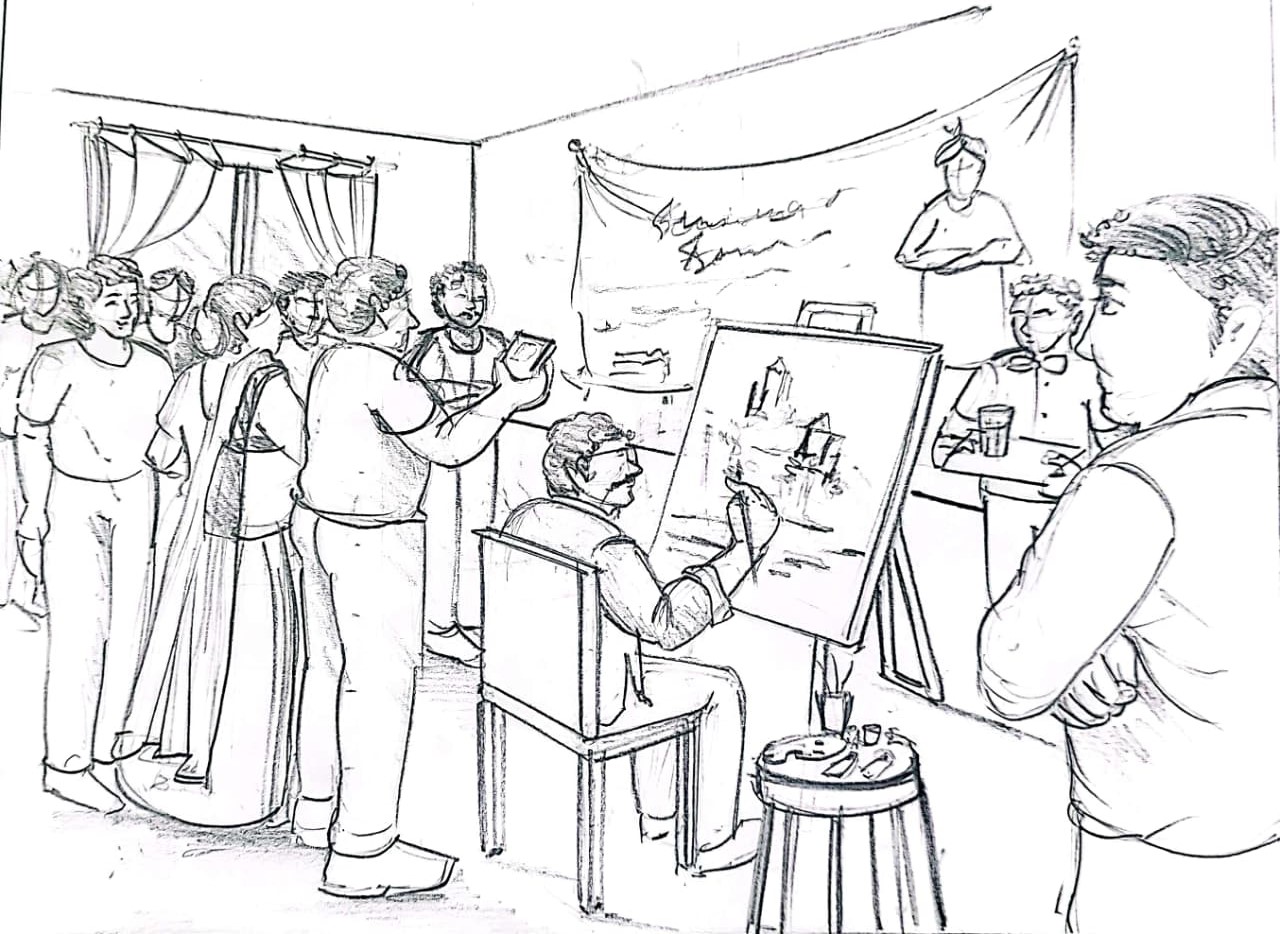
2. Draw a two-point perspective scene showing an art exhibition or live painting session. Depict a person working on a canvas and a crowd discussing artworks in exhibition. You are a part of this crowd and observing the scene. Include elements like furniture, display setup, and lighting to enhance the realism. Draw from a two-point perspective.
Solution:
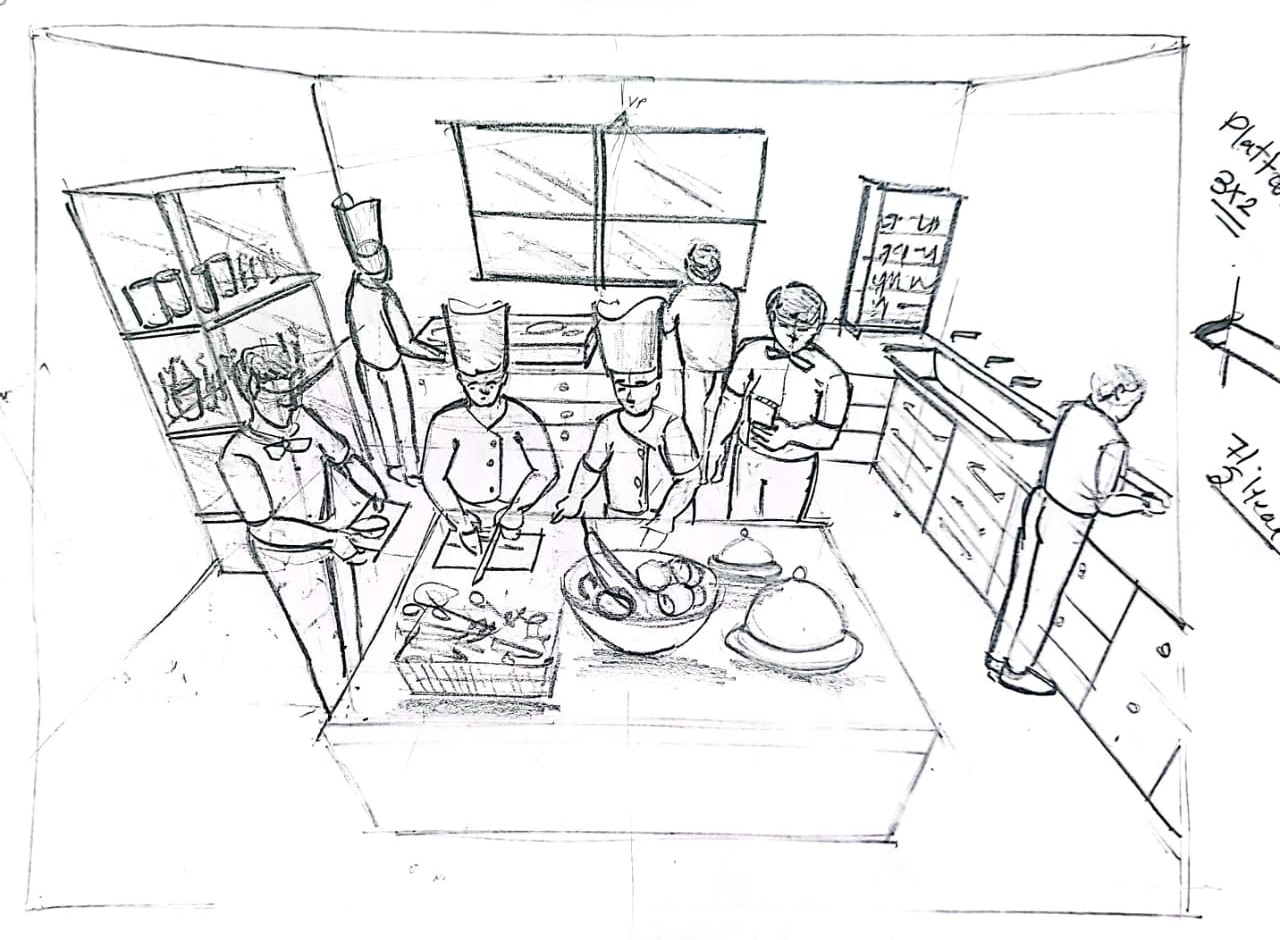
3. Draw a three-point perspective view of a professional kitchen where multiple chefs are busy preparing food. Include realistic details like cooking counters, utensils, wall shelves, and people engaged in different tasks.
Solution:
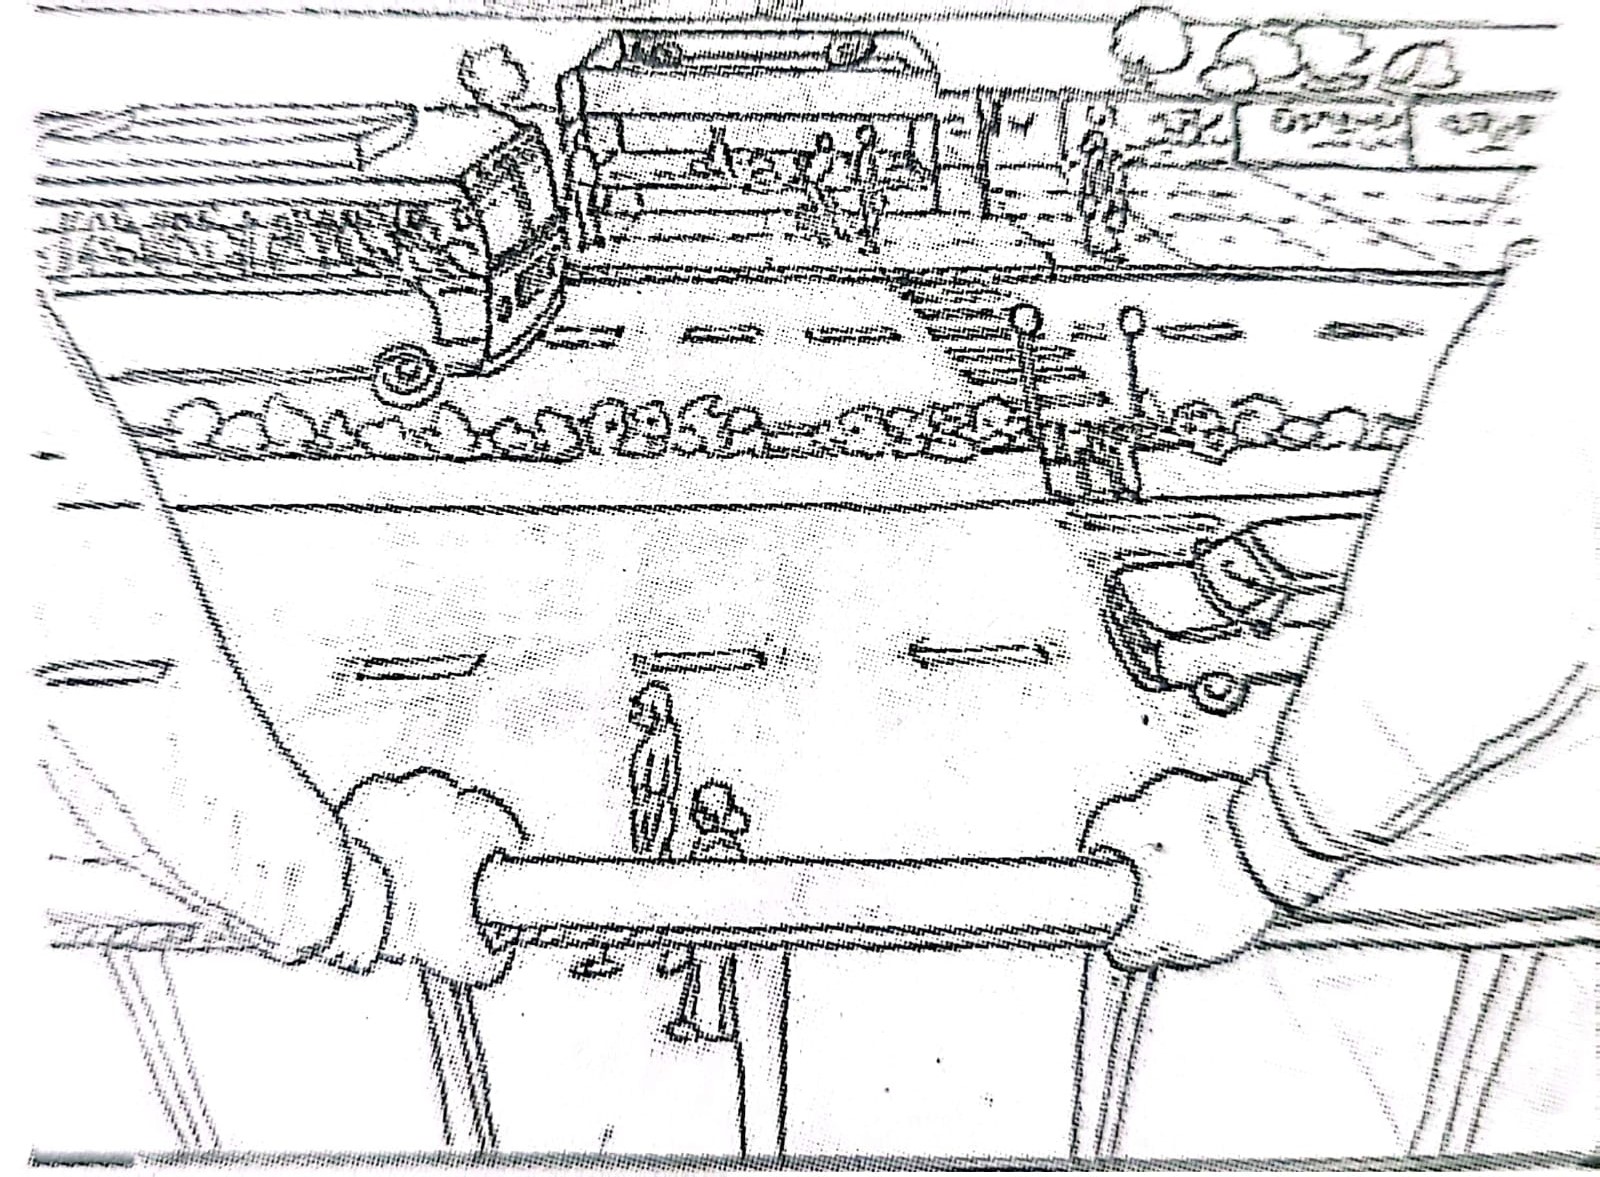
4. Draw a 360-degree panoramic street scene using five-point perspective (fish-eye view). Depict buildings, roads, trees, and vehicles curving around the central viewpoint to give a sense of total spatial enclosure.
Solution:
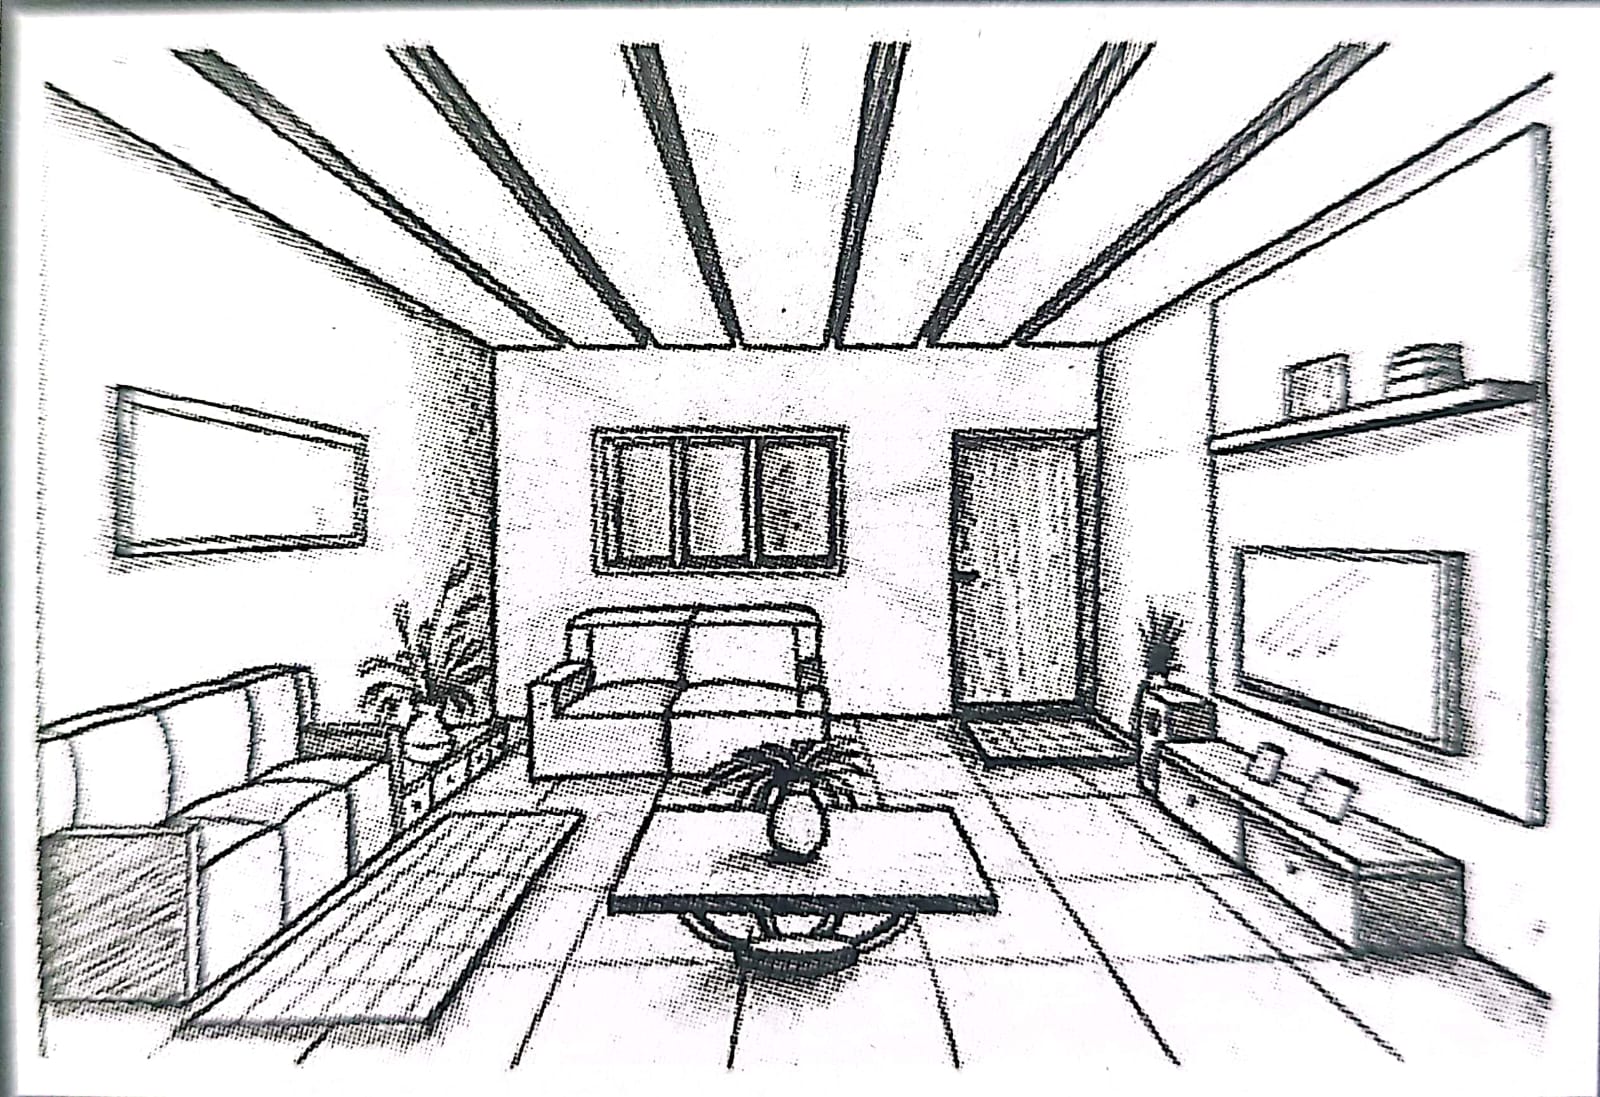
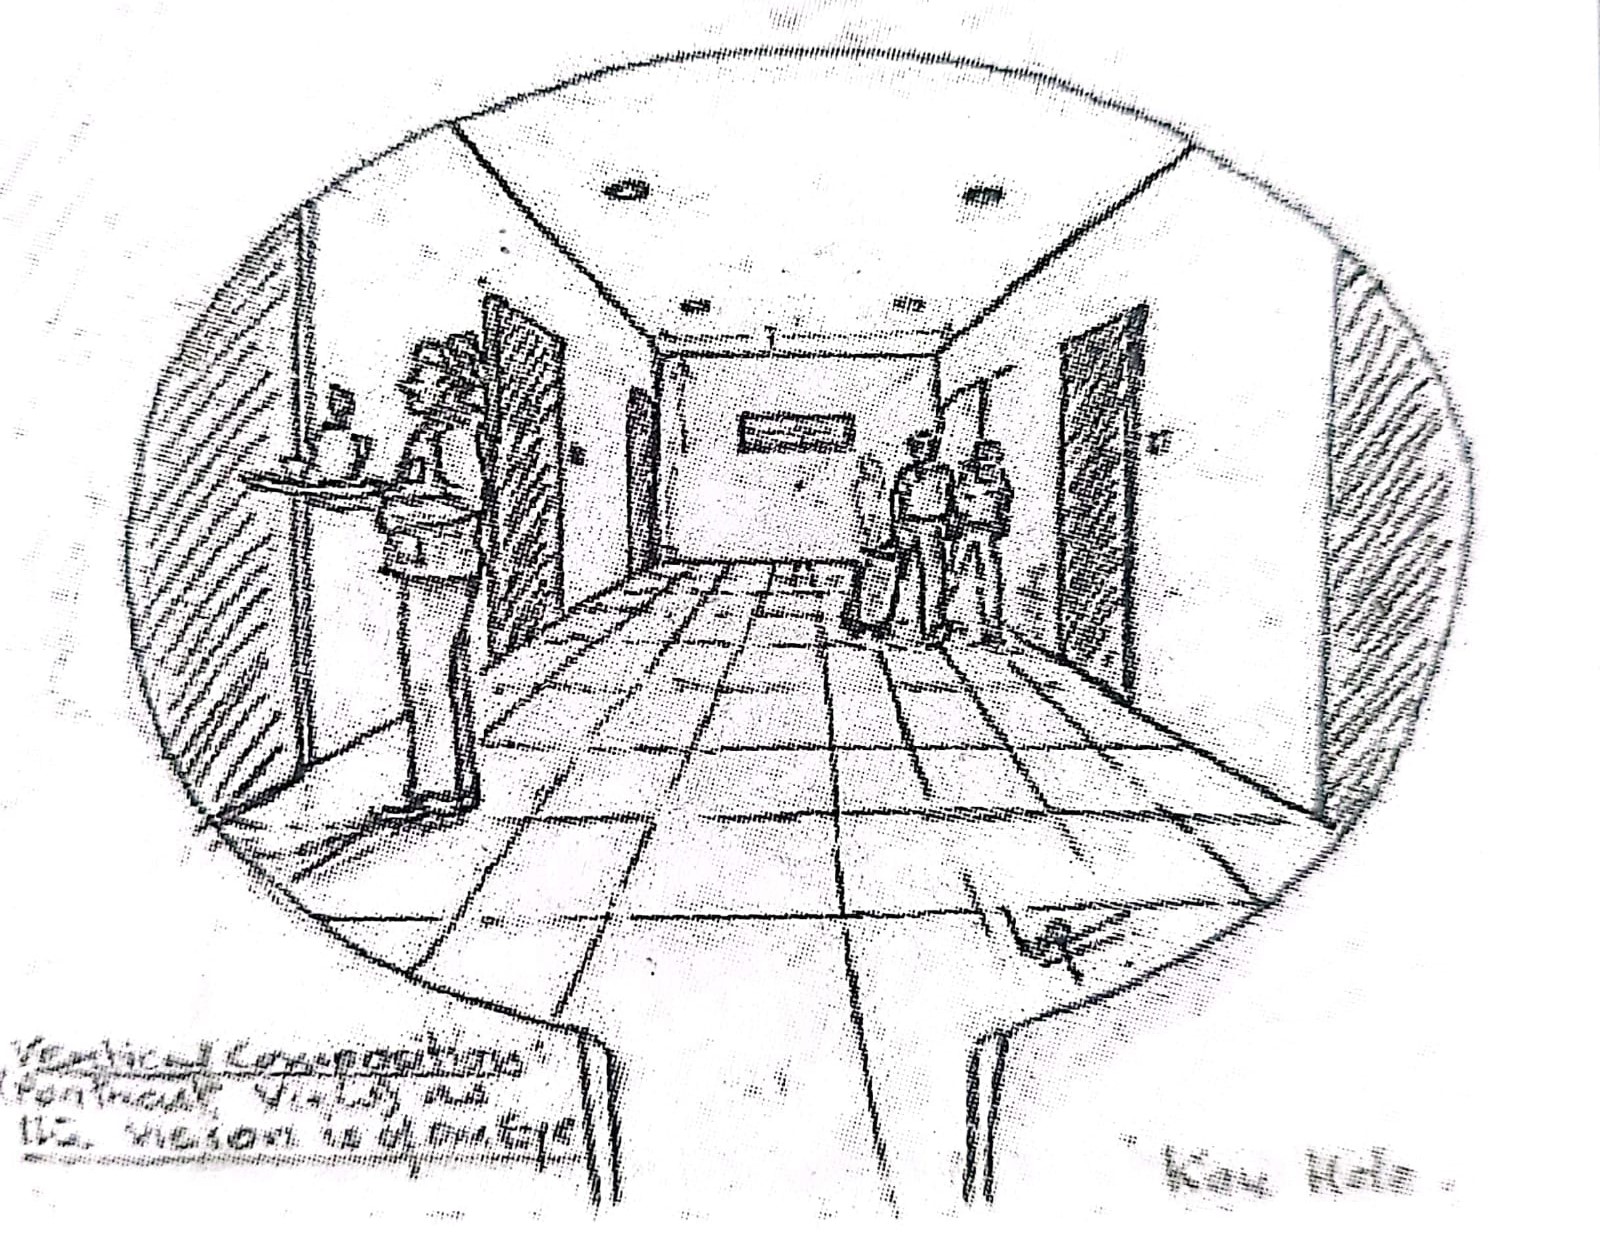
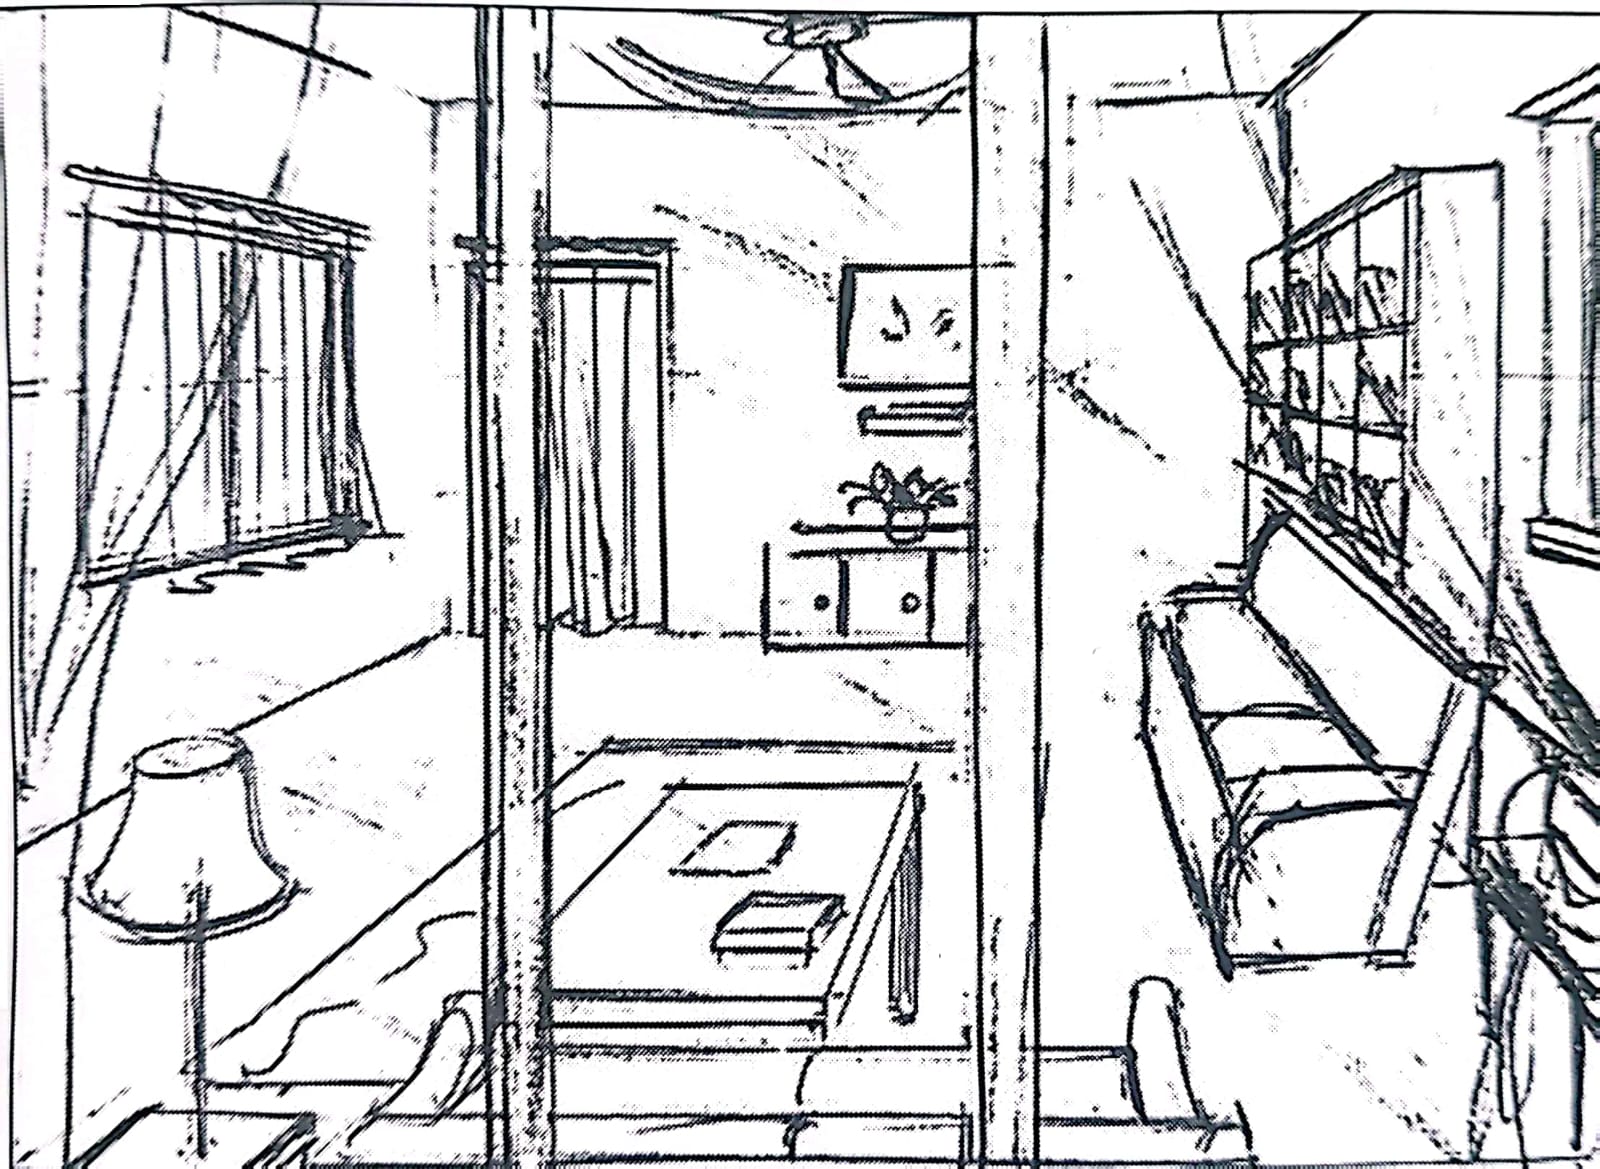
5. Your friend has come to visit you. He is looking from the window outside and your hall shown in the image (x) given below. Visualise and draw what he is seeing from his point of view.
Solution:
Mistakes to Avoid with NID Perspective Questions 2027
1. Using wrong vanishing point count (applying two-point when face-on)
2. Not aligning receding lines to the VP - Skewed or distorted objects
3. Ignoring scale (human figure too big/small)
4. Heavy construction lines left uncleaned
5. Overcrowding details in background causing confusion
Check: Tips to Improve Drawing Skills for NID 2027
Practice Strategy for NID Perspective Questions 2027
1. Start with Daily Warm-Ups (10-15 minutes a day)
- Before diving into complex compositions, focus on the fundamentals of perspective drawing every day.
- Draw simple geometric shapes (boxes, cubes, cylinders, cones) in 1-point, 2-point, and 3-point perspectives.
- Mark horizon lines and vanishing points consciously to understand depth.
- Practice quick “line drills” - straight lines, ellipses, parallel strokes - to improve hand control.
Goal: Train your hand and eye coordination to think in 3D and visualize objects accurately.
2. Progress from Objects to Spaces
- Once you’re comfortable with simple forms, start placing them inside environments.
- Combine multiple boxes to form furniture, tables, or building blocks.
- Create room interiors or street corners using 1-point and 2-point setups.
- Gradually add scale figures (people, trees, vehicles) to show proportion and depth.
Goal: Understand how objects interact spatially within a scene - a skill NID examiners look for.
3. Study Real-Life References
- Observation is key to strong perspective drawing.
- Look at photographs, street scenes, or indoor setups and mentally identify their perspective lines.
- Trace over reference photos to identify horizon and vanishing points.
- Visit markets, classrooms, or parks and sketch quick 2-3 minute thumbnails capturing perspective.
Goal: Train your visual memory - NID subjective questions often ask you to draw realistic scenes from imagination.
4. Practice with NID Previous Year Papers
- Use NID previous year question paper subjective sets and sample perspective prompts to understand exam-level expectations.
- Attempt older perspective-based tasks like ‘draw a street market scene,’ ‘room interior,’ or ‘school corridor.’
- Time your NID perspective questions - spend no more than 30-35 minutes per sketch.
- Compare your answers to reference solutions or mentor evaluations.
Goal: Get familiar with NID’s drawing style and question phrasing - often, 1-2 perspective-based questions appear every year.
5. Increase Complexity Gradually
Don’t jump directly to five-point or curvilinear perspective.
Move step by step:
Week 1: One-point perspective (rooms, corridors, hallways).
Week 2: Two-point perspective (buildings, streets, outdoor stalls).
Week 3: Three-point perspective (aerial/bird’s-eye and worm’s-eye views).
Week 4: Advanced styles (fish-eye / 5-point and sectional perspectives).
Goal: Build muscle memory through structured repetition, not random sketches.
6. Add Human Figures for Scale and Story
- Perspective drawings in NID aren’t about buildings and streets alone - they’re storytelling tools. Always include humans, animals, or objects to define proportion.
- Practice gesture drawing - quick 30-second to 1-minute sketches of people walking, sitting, or interacting.
- Blend these figures naturally into your perspective scenes.
Goal: Add life, relatability, and narrative depth to your compositions - something examiners love.
7. Work on Shadows, Light, and Composition
- A technically correct sketch can still look flat without tonal depth or light direction.
- Choose a light source in your drawing and shade consistently.
- Practice shadow projection based on perspective - it adds realism.
- Use composition rules (like the rule of thirds, balance, and focal point placement) for visual flow.
Goal: Make your drawing look finished, dynamic, and professional - not just technically correct.
8. Feedback & Analysis
- Improvement comes from feedback.
- After every few sketches, review your own drawings or get them checked by mentors.
- Check: Are all lines meeting at the vanishing points? Are proportions believable? Is there a clear foreground, midground, and background?
- Redraw flawed parts - this correction builds long-term accuracy.
Goal: Turn errors into learning patterns instead of repeating them unknowingly.
9. Create a Personal Perspective Bank.
- Maintain a sketchbook or folder with your best perspective drawings.
- Divide it by perspective type (1-point, 2-point, etc.).
- Label each with notes: number of VPs, angle of horizon, and main learning points.
- Over time, you’ll have a personal visual library to reference before the exam.
Goal: Build confidence and a ready source of visual recall for exam scenarios.
10. Attempt Timed Mock Tests
- Simulate the real NID exam at least once a week.
- Assign 30-40 minutes for each NID perspective question and try to reduce the time and increase the accuracy with each mock.
- Use previous or mentor-designed questions.
Evaluate yourself on:
- Perspective accuracy (20%)
- Composition (20%)
- Originality (20%)
- Detailing (20%)
- Presentation neatness (20%)
Goal: Develop speed, focus, and compositional confidence under time pressure.
NID Free Mock Test Series - Attempt mocks and get complete video analysis, see where you stand in your prep now!
11. Experiment with Creativity
- Once you’ve mastered accuracy, start adding imagination.
- Convert a regular room into a futuristic control room.
- Transform a city street into a flooded or floating marketplace.
- Add narrative twists - what if it’s raining? or what if seen from an insect’s eye?
Goal: Move from technical correctness to creative storytelling - the hallmark of top NID scorers.
12. Stay Consistent
- Perspective mastery is not about talent but discipline.
- Practice at least 3-4 NID sketching questions a week, alternating between interiors and exteriors.
- Track your progress weekly - note improvement in proportions, line clarity, and imagination.
- Review previous mistakes monthly.
Goal: Build steady progress through routine - consistency trumps intensity.
To excel in NID perspective questions 2027, balance technical precision with creative imagination. Practice regularly, observe real environments, study past papers, and evolve from simple boxes to full storytelling scenes. The best answers in NID exam 2027 are not just “accurate”- they’re alive, believable, and visually engaging.
Conclusion
NID perspective questions are a critical part of NID’s creative evaluation. Getting the basics of vanishing points, horizon lines, scaling, and clean presentation right makes your solution stand out.
Practice regularly, learn from NID perspective questions and answers included here, and use the methods above to build clarity and confidence.
If you want step-by-step walkthroughs, mentor feedback on your perspective sketches, or a curated set of perspective prompts + model answers, join CreativEdge NID online coaching and we’ll guide you to excel.
Preparing for NID 2027? We can help you with exact strategic roadmap, study material and crucial feedback required to ace this exam.
Join CreativEdge, India’s leading NID online coaching and and get expert guidance on all NID 2027 subjects.
You can enroll in offline NID batches at your nearest centres also!


Frequently Asked Questions
Are perspective questions common in NID DAT?

Do I need color in perspective drawings?
How many vanishing points should I use in NID perspective questions in 2027?
Can I practice NID perspective questions for 2027 exam without good enough drawing skills?
Where to find nid perspective questions and answers?

Vineeta Agrawal
Communications Executive
SHARE